Flutter 개발 Story
DjangoRestFramework를 이용한 RestAPI 구축하기 - 1 본문
DjangoRestFramework(이하 drf)
DjangoRestFramework(drf)란 Django에서 RestFulAPI 서버를 쉽게 구축할 수 있도록 도와주는 오픈소스 라이브러리이다.
참고 사이트 - www.django-rest-framework.org/tutorial/quickstart/
DRF를 위한 사전 세팅
mkdir 프로젝트명
cd 프로젝트명
//가상환경 생성
python3 -m venv env
//가상환경 활성화(윈도우에서는 env/Scripts/activate)
source env/bin/activate
//장고 설치
pip install django
//DRF 설치
pip install djangorestframework
//프로젝트에 어플리케이션 설정
django-admin startproject 프로젝트명 .
cd 프로젝트명
django-admin startapp 어플리케이션명
cd ..
//Django 기본 db인 sqlite에 동기화
python manage.py migrate
//최초 사용자 생성
python manage.py createsuperuser --email admin@example.com --username admin
//서버 작동
python manage.py runserver
용어정리
Model관련
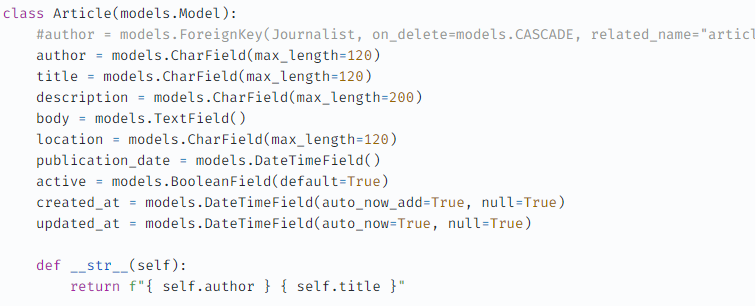
model - dto같은 개념
models.CharField - dto 필드의 String자료형
models.TextField - dto 필드의 String 자료형
models.BooleanField - dto 필드의 Boolean 자료형
models.DateTimeField - dto필드의 DateTimeField 자료형
__str__() 메서드 - 모델 클랙스 객체의 문자열 표현을 리턴함.
models.CharField와 models.TextField의 차이점
CharField는 길이를 지정하기 때문에 최적화와 저장 공간에 효율적이지만, TextField는 길이를 지정하지 않기때문에 효율적이지 않음
예제
project - newsapi
app -api
1. News API Serializers
1.1) /news/model.py

1.2) 관리자 생성
python manage.py createsuperuser
어드민.py에 아래 내용 작성
from news.models import Article
#어드민에 해당 모델 등록
admin.site.register(Article)
1.3)news/api/serializers.py 작성

Serializer란 쿼리나 모델 객체등을 json이나 xml로 변환해주는 것을 의미함.
(dictionary 타입)
Serializer, Deserializer 이해하기
1)모델을 Serialize하기
from news.models import Article
from news.api.serializers import ArticleSerializer
#Article 객체, serizlier 초기화
article_instance = Article.objects.first()
serializer = ArticleSerializer(article_instance)
#Article 객체 데이터 접근하기
article_instance
-> 결과 <Article: Jone doe How to be CEO>
Article.objects.values()
-> 결과 <QuerySet [{'id': 2, 'author': 'Jone doe', 'title': 'How to be CEO', 'description': "it's tough", 'body': 'hahaha', 'location': 'Seoul', 'publication_date': datetime.datetime(2020, 7, 8, 9, 12, 41), 'active': True, 'created_at': datetime.datetime(2020, 7, 8, 9, 12, 43, 445883, tzinfo=<UTC>), 'updated_at': datetime.datetime(2020, 7, 8, 9, 12, 43, 445907, tzinfo=<UTC>)}]>
article_instance.author
->결과 'Jone doe'
#Serializer 데이터 접근하기
serializer.data
->결과 {‘id': 2, 'author': 'Jone doe', 'title': 'How to be CEO', 'description': "it's tough", 'body': 'hahaha', 'location': 'Seoul', 'publication_date': '2020-07-08T09:12:41Z', 'active': True, 'created_at': '2020-07-08T09:12:43.445883Z', 'updated_at': '2020-07-08T09:12:43.445907Z'}
serializer.data['author']
->결과 ’Jone doe'
2)데이터를 Deserialize하기
from rest_framework.renderers import JSONRenderer
#serializer.data를 JSON화
json = JSONRenderer().render(serializer.data)
-> b'{"id":2,"author":"Jone doe","title":"How to be CEO","description":"it\'s tough","body":"hahaha","location":"Seoul","publication_date":"2020-07-08T09:12:41Z","active":true,"created_at":"2020-07-08T09:12:43.445883Z","updated_at":"2020-07-08T09:12:43.445907Z"}'
#json을 dictionary화
import io
from rest_framework.parsers import JSONParser
stream = io.BytesIO(json)
data = JSONParser().parser(stream)
data
-> 결과 {'id': 2, 'author': 'Jone doe', 'title': 'How to be CEO', 'description': "it's tough", 'body': 'hahaha', 'location': 'Seoul', 'publication_date': '2020-07-08T09:12:41Z', 'active': True, 'created_at': '2020-07-08T09:12:43.445883Z', 'updated_at': '2020-07-08T09:12:43.445907Z'}
2-1)Serializer화하여 데이터 저장
serializer = ArticleSerializer(data = data)
serializer.is_valid()
#serializer로 객체에 데이터 저장하기
serializer.validated_data
-> 결과 OrderedDict([('author', 'Jone doe'), ('title', 'How to be CEO'), ('description', "it's tough"), ('body', 'hahaha'), ('location', 'Seoul'), ('publication_date', datetime.datetime(2020, 7, 8, 9, 12, 41, tzinfo=<UTC>)), ('active', True)])
serializer.save()
-> 결과 {'author': 'Jone doe', 'title': 'How to be CEO', 'description': "it's tough", 'body': 'hahaha', 'location': 'Seoul', 'publication_date': datetime.datetime(2020, 7, 8, 9, 12, 41, tzinfo=<UTC>), 'active': True} <Article: Jone doe How to be CEO>
#데이터 저장돼있는지 확인
Article.objects.all()
-> 결과 <QuerySet [<Article: Jone doe How to be CEO>, <Article: Jone doe How to be CEO>]
Serializer 역할 이해하기
1. Serializing objects - 객체를 가져와 데이터로 뿌려줌(GET일때)
serializer = CommentSerializer(comment)
serializer.data
-> 결과 # {'email': 'leila@example.com', 'content': 'foo bar', 'created': '2016-01-27T15:17:10.375877'}
2. Deserializing objects - 데이터를 받아 DB에 저장할 수 있도록 데이터 유효성 검사를 한 뒤 dictionary형태로 변환
(POST, PUT, PATCH일 때)
serializer = CommentSerializer(data=data)
serializer.is_valid()
-> 결과# True
serializer.validated_data
-> 결과 # {'content': 'foo bar', 'email': 'leila@example.com', 'created': datetime.datetime(2012, 08, 22, 16, 20, 09, 822243)}
3. Saving instances - deserializing된 객체를 db에 저장
comment = serializer.save()
3.1) 저장
serializer = CommentSerializer(data=data)
serializer.save()
3.2) 업데이트
serializer = CommentSerializer(comment, data=data)
serializer.save()
3.3) 저장된 객체에 추가 데이터 저장
serializer.save(owner=request.user)
3.4) 객체 저장없이 이메일이나 메세지만 보내게 하기
class ContactForm(serializers.Serializer):
email = serializers.EmailField()
message = serializers.CharField()
def save(self):
email = self.validated_data['email']
message = self.validated_data['message']
send_email(from=email, message=message)
'기타' 카테고리의 다른 글
| 렌더링(Rendering)에대하여... (0) | 2021.02.09 |
|---|---|
| DjangoRestFramework를 이용한 RestAPI 구축하기 - 2 (0) | 2021.02.08 |
| 매직 미러 - Google Asistant_SnowBoy대체 (0) | 2021.01.14 |
| 매직 미러 만들기_2(구글 어시스턴트 설정) (0) | 2021.01.12 |
| 매직 미러 만들기_1(매직 미러 설치 및 기타 모듈 설치) (0) | 2021.01.12 |

